I am trying to solve some of the problems with this motor, and make it dependable. I am looking at it as a challenge. I am NOT trying to make it a race motor. I am NOT trying to make it a full blown tow vehicle.
What I am trying to do is solve the detonation problem with these motors, and come up with a viable alternative to making the cam last longer. THOSE are my objectives. The stroker is just 'bonus' play work. Something to test my motor making skills.
The cam issue is NOT, I repeat NOT, due to the company that makes them.
The stock cam lobes are indeed wider on the stock cams, but the journals on the after market cams are the same thickness as the other motor's i.e. Chevy, Pontiac and the lifters are relatively the same diameter as Jeep's. It is NOT just Jeep cams that getting wasted. SBC's, older Fords, Rolls Royce, Porsche and any other motor that has flat tappet cams is being hit.
I think the reason the factory cams are holding up better (from what I have heard) is that they have already been run during the period when all oils had high Zinc levels. They are being reinstalled from previous motors. This would have work hardened the surface, and already impreganted the surface with these elements, in essence making it more durable.
The removal of ZINC and Phosphorus from the oil to reduce emissions and extend the life of catalytic converters is the culprit. NOT the cam manufacturers. I do factory warranty claims and we are getting a lot of flat tappet cam claims from factory motors due to the this issue.
I am using Comp Cams lifter savers and will be using an oil with at least 0.12 PPM of Zinc and 0.12 PPM of Phosphorus. This may be Redline, Valvoline VR1, Royal Purple or maybe Brad Penn oils. I may possibly use EOS 10-106, STP Red or Justice Bros Oil Treatment. All of these oils are NOT recommended for street use due to the high levels of these additives.
I may even send in my Comp Cams cam to be Pro-Plasma Nitrided. This will harden the surface to a depth of .010".
The straight racing oils usually are required to be changed after 500 miles, but oil like VR1 can run to a regular 3000 mile interval. High levels of Zinc and Phosphorus will clog catalytic converters, THAT is what makes these oil "off-road use only" labeled.
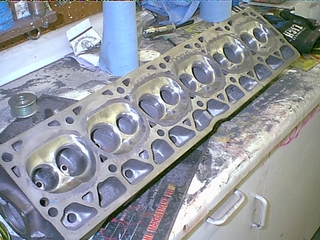
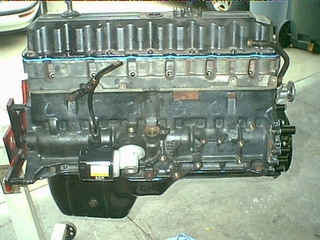
OK. So it was back to work on the Jeep motor.
I just finished up the chambers. Tomorrow I will be CC'ing them to make sure they are all the same size.
The plan is to complete the chambers tomorrow night. CC them, and then make any adjustments. They should be pretty close from the templates I made.
The Sat and Sunday work on the intake and exhaust runners and valve openings. I want to be able to get the head the machine shop for the finished 3 angle valve job on Monday.
I should start to get engine parts back next week. I still have to relieve the under side cylinder walls.
I will box up the cam and send it off to be nitraded. I should be ready to start assembling within the next couple of weeks.
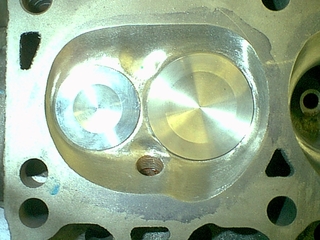
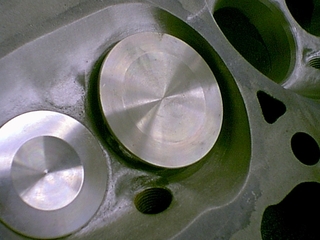
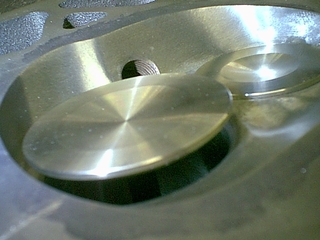
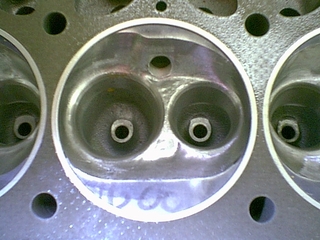
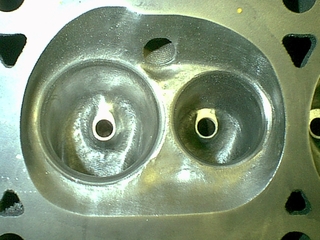
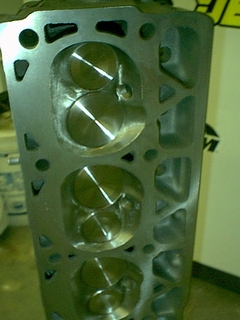
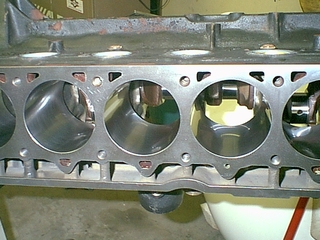
Here is a shot of the chambers to their new size of 65cc's. Then I will have the head flat cut, just a touch to clean it up. That should bring it back to around 64cc's.
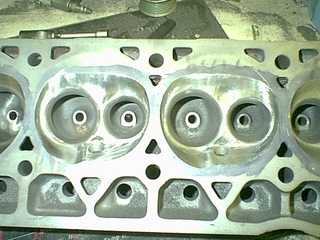
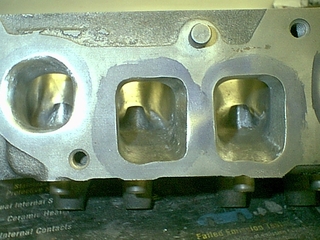
You can see in these pictures that by opening up the chambers, it really helps to unshroud the bigger valves. There has been a TON of material taken out to make this work. It is about an hour per chamber to get them to this point. The edge of the valve to the edge of the chamber is actually greater now, than with the stock valves.
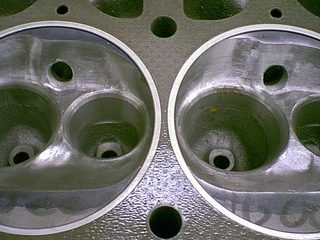
I used Dykem to outline the bores on the head gasket. They are exactly at the edge.
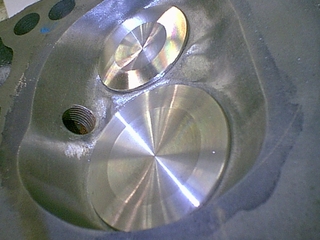
In fact, I just came in from the finishing touches on the edges to bring them just to the edges.
I also finished CC'ing them. I have 3 cylinders at 65cc's, and 3 at 63.5cc's. I have to do a little finish work. It won't take much to make up the other 1.5cc's. I don't think that is too bad for a first shot at all 6 chambers, by hand.
I have always left the valve cutting to my valve guy. He knows his stuff. He said he has something in store for me. I think he is going to do a really nice 3 angle for me.
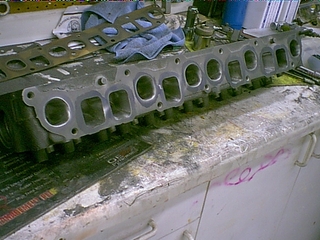
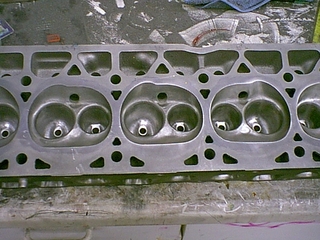
Here are some pictures of the head with head gasket in place show the chambers in relation to the head gasket.
Working on snowmobile cylinders is a little harder. That is porting aluminum. At least with working steel cylinder heads your mistakes are easier to fix. The bits aren't taking as much as when working on aluminum.
This weekend is hopefully finishing up the intake and exhaust runner and bowls so I can get it to the machinist on Monday. I have to drop off the balancer, flex plate, rod bearings and rings so they can balance the rotating assembly. We still have to mill off 10mm on the crank snout, install the ARP rod bolts and resize the rods after that.
I will have to bring it home and assemble the rotating assembly in the block, the find the clearance for decking the block to 0.010". That, along with the 0.043" head gasket should give a quench of 0.053". Right in line where I want it to be.
Then it will be assembly time.
Got back at this week. I took yesterday afternoon to stay home with the wife. She napped, and I headed to the garage.
I finished up the head this evening and will be dropping it off at Sperry Engines tomorrow. I will also be dropping off a set of rings, rod bearings, the ARP bolts, balancer and flex plate so he can balance the rotating assembly.
He should finish up the head and have it ready for assembly with the next week, or so.
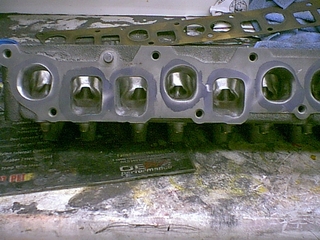
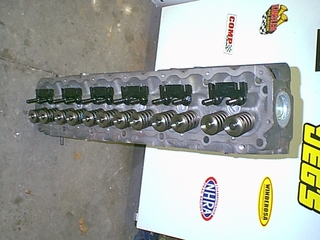
Here is the finished port work, and ready to go to the machine shop for the 3-angle valve job, milling down the rocker arm bosses and a flat sweep of the head.
I dropped off the head and the two valves I brought home at Sperry Engines today.
I also dropped off the rocker arm studs and pushrod guides so they could be machined into the head. I am having them cut it down 0.400" inch to accept the studs.
I will have to wait until I get the motor together to order my pushrods. I will have to measure them to get the correct length once the motor is together.
I also dropped off the main bearings, a set of rod bearings, a set of rings, the new ARP rod bolts, the new dampner, the flex plate and bolts so the rotating assembly could be balanced. I already balanced the pistons and rods so all that is left is to balance the crank with the weight on it.
I am also having him cut 10mm off the snout of the crank to fit the new style balance/pulley.
He is going to deck the block to 0.010", with the Mopar Performance head gasket of 0.043", that will give me a quench height of 0.053". Mopar suggests a quench of a minimum 0.040" to a maximum of 0.060". This should put me just in the middle.
With the new larger chamber, quench at 0.053" and 18cc pistons. I should have a compression ratio of 9.08:1. I should be able to run 87 octane gas running around town, and change to 91 octane when pulling under load.
The shop said they should have everything done in about 2 weeks. So once it gets back, I will be posting the progress of the new build. I will actually be getting to put it back together. YEAH!!!
Once the old motor is out, I will have the Doug Thorley header coated in ceramic and also the intake manifold. I will have to show the new setup to use the 2000 style intake, on the 94 configuaration..and still use all the 94 accessories so you don't have to mix and match.
I feel like it is Christmas around the corner. I am getting stoked to get it back and start putting it together.
I need to start working on the adjustable MAP sensor, so it is ready to go.
Well. The assembly has started.
It looks like I will be keeping the Jeep a bit longer. The wife said I could either look into a newer vehicle, or modify the snowmobile motor. Since my company motto is "because stock s*%#s...." guess which I opted for.
The sled will be getting an overbore kit and should be pushing around 172hp.
I am fixing up the Jeep a little. I bought black leather seats and center console from Puma. I got new black carpet floor mats and will be getting new black carpet. I am going to dye the top of the dash and carpet inserts in the door black. I have the driftwood interior now and my driver's seat is starting to show its age.
This morning, I helped out my neighbor in his shop. I did the plumbing work for him. After the flood damage, he had all the walls torn out so he decided it was a good time to convert the galvanized pipes over to copper and plastic.
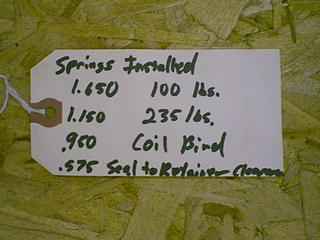
This after noon, I assembled the head and took readings off them. I included my very sophisticated engine tag to show the head numbers for the lifts.
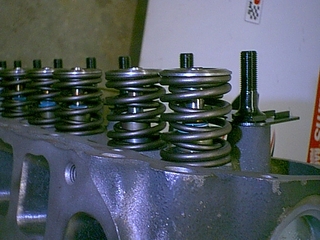
Here are the specs on the valve train springs using the Australian fine wire springs.
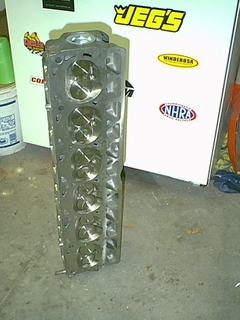
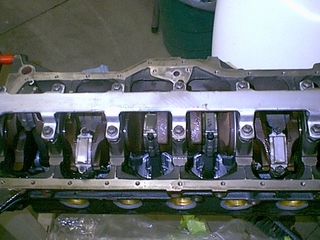
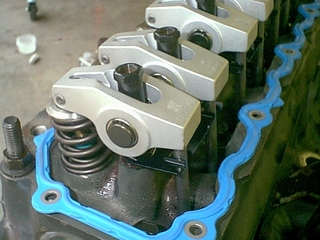
Here is the head with most of the valve train installed. I do not have the rocker arms on it for obvious reasons. I may put them on just to shoot a picture for the 'cool factor'. LOL.
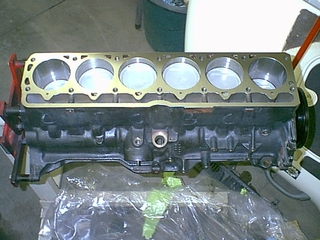
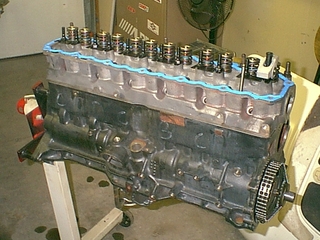
Here is all the stuff with the machine work finished. I still have to radius the underside of the block for the rod clearance. Other than that, it is ready to be put back together.
I'll have some pictures of the rods and the pistons later next week. I am heading to Wisconsin tomorrow for Fish Fest. A bunch of snowmobilers get together each summer and have a party. I won't be home until Sunday night.
Have a GREAT weekend. I know I will.
I am using dual springs not because I am planning on reving the motor high, but because it cuts down on valve train harmonics. If you will observe the spring pressures in my last post, closed pressure = 100lbs, open = 235lbs. That is pretty close to stock pressures. Stock springs were rated at 105lbs closed, and 245lbs open.
I am using a Comp Cams cam (I have the number at home, but not with me at work) that has been nitrated and cam saver lifters that have been machined with a small area of the side of the arc removed to allow more oil to pass to the cam lobes.
I am going to clearance the underside of the cylinder sleeves to allow for .100" clearance. I am using a 1988 4.2L crank and 94 4.0L rods.
I got my MP head gasket from Summit Racing.
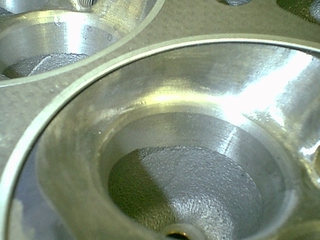
I did not have to move the location of the valves at all. I opened up the quench area and deepened the pocket for the valves. I expanded the size of the combustion chamber to 65cc's. There is actually more room now with the bigger valves, than there was in the stock configuation. The valves have way less of the valve head shrouded by the sides and back of the chamber.
�
The exhaust ports aren't really that much bigger. They flare out at the end to match up with the Doug Thorley header. It is a smooth transition, and it flares out towards the end to equal the wall diameter of the header. I wanted to keep the water jackets at least 0.250" thick to prevent cracking.
The guide plates are actually from a Magnum motor. The part number from Summit Racing is CCA-4842-6. They run $12.95 for 6 of them.
The rocker studs are part number CCA-4542-16. The are also from a Chrysler small block. They are $68.95.
The cam I am using is Comp Cams part number 68-232-4, with a .462 intake, .478 exhaust.
It didn't really matter to me what the maximum amount of flow was. I was mainly concerned with the improvement over stock in the flow numbers. Ultimately, the dyno will tell the final HP numbers.
�
I was originally designing this to be a production based business oportunity. But the interest was not really there. I had bunch of products given to me for the research, and other stuff sold at cost.
The idea was to have this completely done ready to drop in completel with roller rockers for the $2000 mark.
I have more time than money invested at this point. I might have $1500 in it when it is done. Probably less. Some of that expense was non-performance stuff like a new flex plate, a new harmonic dampner, double roller timing chain.
I used the machine shop at Recreational Motorsports to bore out my TB. I made the throttle plate at our local CNC Class at our community college.
I got a set of Doug Thorley headers, I think those were $375 from Summit Racing, with my discount. I also got a 2000 intake manifold for like $100. I modified that to fit the 94 motor configuration.
The valves, valve springs, titanium keepers and retainers were sold to me at cost from Engnbldr.com. It ran me like $120 for all that. The abrassive kit was given to me by Sperry Engines. The Super Flow bench time was donated by Sperry Engines, as well as most of the machine and balance work. I also did alot of the machine work myself. I left the performance valve-job to Sperry Engines.
I spent about 3.5 hours polishing the rods.
The pistons I got off ebay. It cost me $115ish to have the pistons dished. The rings, rod, main and cam bearings I got at cost from Sperry Engines, along with brass frost plugs.
I have about 60+ hours in the head with the chamber, intake and exhaust runner work, flow bench time and machine work.
The engine work was pretty straight forward after the pistons were dished. I have the pistons coated with a thermal barrier coating on the tops, and a poly coating on the skirts at Cool Concepts for about $100ish.
If somebody were to pay to have all this work done, it would be expensive..especially the head work that was done. The machine work for getting the block completely done (ready to put on the head) would probably run about $1000. I know I wouldn't do the chamber and port work on another head like this for $600.
To have somebody build a motor like this, with everything being hired out....I would guess in the range of $3500-4500 maybe a little more.
�
OK.
It was back to work on the stroker motor this weekend.
I got the whole motor platicgauged, just to check all the clearances on the mains and rods.
I ordered the Clevite MS704P-10's, and then found that they are the other mains, the MS1947P10. After making about (what seemed like) about 40 phone calls, I found a set.
Then got the hardened Grade 8 washers for the stud girdle, and mounted up the oil pump and pickup. Then I used some Silly Puddy to set the depth on the oil pick up.
Then I checked the deck height on my cylinders. They are all around the 0.008" to 0.010" that I wanted.
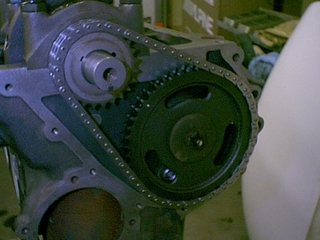
I then moved on to the Cloyes double roller timing gear/chain. I got that degreed in to straight up with my degree wheel.
Then put the head on. I got to the number 11 position head bolt, torqued to 22lbs, then to 45lbs, then on to the 100lbs. It didn't get to 100lbs before it snapped off. I had to take the head back off, and drill it out. It came out easily. Luckily, I had more head bolts laying around the shop. I put the Loctite sealer back on it, and put the head on.
I need to paint up the timing cover then install the cover. I need to install the Flow Kooler water pump, and oil filter adapter. I also need to get an adjustable push rod to get the proper length push rod. Mine is too long to measure these.
I should be ready to drop it in the Jeep, hopefully, next weekend.
I got the pushrods measured up tonight. I will be ordering them in the morning. Hopefully, they will be here by the weekend.
I am trying to shoot for Sunday to drop in the motor. We'll have to see.
The valve cover fits just fine over the roller rockers. So that was a worry that came out correctly.
Tomorrow night I will be installing the timing cover, the oil pan and the water pump.
I might shoot with some black paint to pretty it up some.
If the pushrods get here by the weekend, I can set the lash. Then I can prime the oil pump and rotate the engine over a few revolutions to get the lifters pumped up.
I like to set the lash with the lifters not pumped up. Then prime the oil pump and rotate the motor by hand to get them all filled and the oil flowing before firing it up dry
I ended getting the first set, and they were not hardened.
Since I am using an adjustable valve train with guideplates, that wouldn't work. I sent them back and told that part of the reason I needed them made was because they needed to be hardened. I sent them back....and waited.....and waited.....and waited......and...well, you get the picture by how long it has been since I have posted.
I ended up digging through some old TRW engine parts catalogs, and spec sheets. I found that the old Buick 455 pushrods were only 0.005" longer than the set I was having made. SCORE. So I canceled my $146 pushrod order, and ordered my pushrods from Comp Cams. I got them from Sperry Engines here in town. I ordered them on Tuesday last week, and picked them up Friday.
I will putting the finishing touches on the motor this week.
I also purchased an electric cooling fan from a older Taurus. They come stock with a 2 speed fan, and the shroud just about fits perfectly. So while it is apart, I will be installing that as well.
The boat is just about finished up, and I am about ready to start putting this whole thing together.
I also found a chassis dyno about 20 miles from here that does tuning on FI motors as well. They have an exhaust sniffer. I am stoked that I can tune it properly while under load without having to spend a day driving back and forth on the road and pulling spark plugs.
�
The screw in studs have a wide base that tapers to 3/8" up the shaft. I mic'd it out to where the taper starts to the bottom of the base that mates to the surface. I then mic'd out the thickness of the guideplate. The total of all that came to just under .398" so I rounded up to .400" for ease of machining.
When using roller rocker arms, I wasn't comfortable with the amount of threads on the polylocks, because of the thickness of the pivot on the roller rockers. It only had about .375" of actual threads. The polylocks I got had .125" of a lip with no threads, so I machined them down to first of the threads, now I have .500" of biting threads. That is plenty.
By using this measurement, it keeps everything at pretty much the same angles. I had to have custom length pushrods because of the larger valves, with different lengths, I had installed. I had to sink them to adjust not only for the LS1 length, but also the chamber work that was done to get to 65cc's. If you install an adjustable valvetrain with a standard head, (using those same measurements) you should be able to use the stock length pushrods.
I am speaking in general terms. If you do this conversion, you should always take the measurements of your parts, then make the cut based on your measurements. This will at least give you a guide.
�
I will be having Cool Concepts here in Walford do my coatings. They do a great job.
My original coating was a cheezy looking attempt at chrome from Doug Thorley. I originally sent it off to Jet Hot as Cool Concepts were not open yet.
The guy who did my original head work (valve job) sank the valves deeper in the head, and did not tell me. When I put the non-adjustable valve train back together, I found that the valves were hanging open.
The header looked really cool glowing all red. I used a house fan to blow exhaust out of my garage. I had the exhaust about a foot away from it. It got soo hot, it melted the plastic screen and the fan blades on the fan.
When I have it apart, I may have it recoated, I may not. I am only going to be keeping this Jeep until the Camry is paid off. That will be 2 years. Once that is paid, I am getting another vehicle. Probably a new Tacoma with a supercharger from TRD. We'll have to wait and see. I wanted a Venza, but they keep putting that off. I am not sure if they are ever going to come out with it. And I work for Toyota.
�
The fix for the hanging exhaust valves is in.
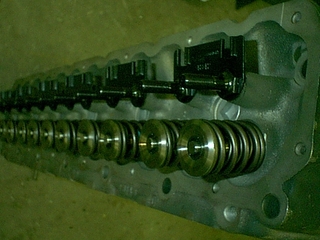
Here are the shots of the valve-train ready to go in. In the morning, I will fill the motor with oil and then prime it, and rotate the crank while driving the oil gear to oil all the way through the system.
I find it starts easier without the lifter pumped up all the way. But you still have the the oil passages filled with oil so they pump very quickly once it fires.
Wednesday after work, I start tearing the old motor out, and putting the new motor in. I think I am going to send the old head over to be milled and put an adjustable valve train in it. It is a good head that has been pocket ported and a new valve job, it just has to have an adjustable valve train to make it function properly. The lower block only has about 25,000 mile on it.
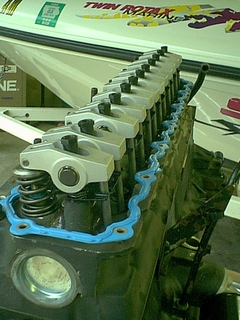
Anyway here is the valve train. It looks really nice. A good bling factor, anyway.
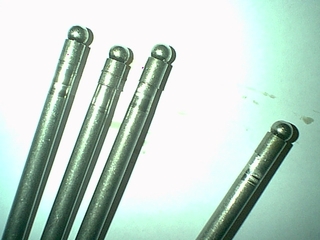
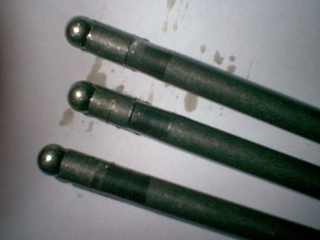
After installing the motor in the Jeep, I starting to hear a clatter from the valve train.� I� pulled the valve cover, and found wear on the push rods.
I also found out the even though Comp Cams Magnum series claims to be guideplate compatible.....they aren't.
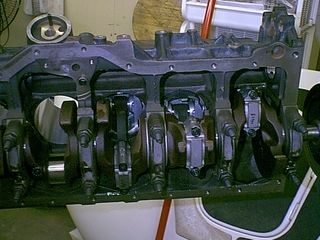
Here is what all 12 looked like. I developed a second ticking noise and thought to myself...here goes another camshaft. Then I thought that can't be it because I used Joe Gibbs break in oil. Then I continue to use his XP3 oil, that has 18ppm of Zinc. I have about 1200 miles on the motor, so far.
So I pulled the valve cover and these are what I saw.
I don't have any dyno numbers yet, but there is no pinging. I have the 24lb injectors with 41lbs of fuel pressure and I have the adjustable MAP sensor set at 5.45volts. The fuel economy computer is way off, it says I am getting about 23-27mpg...when you calculate it out, it comes out to about an average of 16mpg. I do alot of on-ramps on an uphill to get to work everymorning. That is a pretty accurate city and highway combination. I haven't gone through one tank on just the highway yet.
The whole goal was to give me some grunt with the light towing that I do. I took the twin engine jet boat to storage this weekend. The wind was blowing about 20-30 miles per hour, and my buddies barn is about 30 miles away and has some pretty steep inclines. It has plenty of grunt to pull my stuff. It runs WAAAAAY smoother than the stock motor ever did, and has tons more power.